
Hey Hey Friends! I know you guys probably have one of these or something similar, but I didn’t lol. Dinnertime has become a struggle in our house. I have no clue what to feed this family of mine. I’ll go grocery shopping and think that I did a good job, to discover, yep we got nothing even after spending $200. Let’s not forget the complaints that may arise with what you made lol. SOOOOOOO, I had bought this chalkboard from Hobby Lobby when it was on clearance and just stuck it in my “surfaces” box for a rainy day project. It may not be raining, but the light bulb did go off…..Dinner Schedule. We all have to contribute at least one day a week to help give ideas for dinner. It is hung on the wall by the table. Anytime they wonder what we are having, it is there. No more MOM what’s for dinner lol. Rule now, is if you do not like what is on the menu, then you are responsible for making your dinner that night and no it can no be a bag of chips or candy bar haha.
Lets Get Started.
Items Needed for this project:
- Chalkboard of your choosing
- Jenga Blocks (I used 10 of them)
- Paint-Color of your choosing. I am using Magnolia Design Co chalk paint (LOVE LOVE LOVE this stuff) http://mistywilson.magnoliadesignco.com/
- Paintbrush
- Hot Glue Gun
- Iron
- Stencils for the days of the week, Vinyl cut outs from your crafting machine (I love my silhouette) or you can freehand

The first thing I did was paint my Jenga blocks. I chose white chalk paint for my blocks. I also glue 2 of the blocks together. These would form my Days of the Week. Continued doing this with the rest of the blocks, until I had Monday-Friday. I did not do a Saturday or Sunday, cause those days are normally grilling or maybe eat out one day and the husband is responsible for the weekend haha

After all my blocks were glued together, painted and dried, I went to my silhouette. I measured my blocks, so I knew how big to make my words. Didn’t want them being too small or too big. I actually cut mine out of heatpress vinyl. I love working with this vinyl, I hate hate hate using the permanent vinyl that you would use on cups and things like that. We just don’t get a long lol.
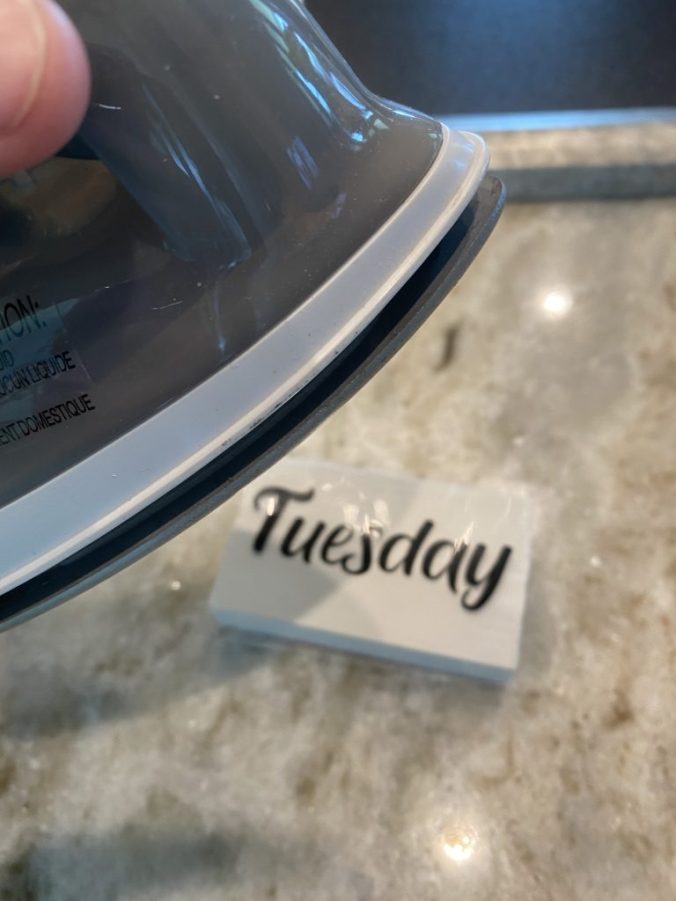
I picked my font, got my sizing to my liking, and hit cut! Easy Peasy!! Weeded my vinyl and headed back to my project area. This is where the cute little mini iron works WONDERS!! Get that puppy heating up, which does not take long at all.
Lay your design on the block, cover with parchment paper, place the iron on there and go back and forth for about 20 seconds. Take a peak and see if the covering comes off easy. If it is not sticking to the surface, apply some more heat with the iron.


Now that we have all of our blocks painted and labeled, it is time to glue them onto our board. Lay them out and decide where you want each block and then glue those babies down. Now you are ready to plan out those dinners.
As I mentioned above, let the family help decide and pick a day for dinner. This gets them involved (which my kiddos love) and honestly makes your job a lot easier on many levels. Make out that grocery list to accommodate for those dinners. Now you’re wondering around the store trying to figure out what you are eating.

I have this huge iron piece that is hanging in my dining area. Never did anything with it, and bam, perfect place to hang the chalkboard. I know that you’re gonna say there is a lot of wasted space, but I have a plan, well kinda lol I will fill it in with some other decorative items. This is all I managed so far, but I will share a picture when it’s completely finished.

I follow Heather with Velvet & Vines Design and she mentioned that she gets her lassos from you but I couldn’t find them on your website. Are you still carrying them? Also can you please notify me when you get the moss boots and hats back in stock. I would greatly appreciate it. Thanks so much 😊
Hey Irene, just send me a message on FB and I’ll get an invoice emailed over. I don’t have the lassos on the page at the moment. I tend to sell out before I even get them on there haha